How to Install Laminate Flooring: Step-by-Step Installation Guide
What You Need Before Installing Laminate Flooring
Before installing laminate flooring, prepare the following materials and tools.
Materials:
Laminate flooring planks
Underlayment (if required by the product or project)
Vapour barrier (when required—typically for concrete subfloors)
Transition profiles
Baseboards or quarter-round moldings
Tools:
Tape measure
Spacers
Tapping block
Pull bar
Saw or laminate cutter
Pencil
Straightedge
Moisture meter
Safety glasses
Knee pads
The following sections explain pre-installation checks, tools, installation steps, subfloor-specific installation, and common problems.
Pre-Installation Checks
Before installing laminate flooring, check the following conditions. If these conditions are not met, installation may fail.
Subfloor Flatness
Check the subfloor flatness against the manufacturer's specification. Uneven subfloors can cause lipping at joints, gaps, and locking system failure.
Moisture
Check the subfloor moisture content. Concrete subfloor moisture content must be verified before installation. High moisture can cause adhesive failure, mould growth, and damage to the flooring. A moisture meter or calcium chloride test can be used.
Room Conditions
Check the room temperature and relative humidity. The installation area should be at a stable temperature, typically 18–25°C, with relative humidity typically 40–65%. Acclimate the flooring in the installation area before installation. If the room conditions are outside these ranges, adjust the HVAC system or wait for conditions to stabilise before installation.
Expansion Requirements
Check the expansion requirements for the product and the room size. Expansion gaps must be provided at the perimeter and at intermediate intervals. The required gap depends on the room size and the expected temperature variation. Follow the product installation manual.
Product Compatibility
Check that the product is compatible with the substrate and the intended use. For example, verify that the product is suitable for underfloor heating if underfloor heating is present.
Underfloor Heating
If underfloor heating is present, verify the product's underfloor heating compatibility and follow the underfloor heating manufacturer's instructions.
Note: Technical parameters such as AC3/AC4/AC5, HDF density, and locking strength are product selection considerations. For installation, the key factors are subfloor condition, moisture, room conditions, and expansion requirements. See the laminate hardwood flooring page for product selection guidance.
Tools Needed to Install Laminate Flooring
| Tool | Purpose |
|---|---|
| Tape measure | Measure rooms and planks |
| Spacers | Maintain expansion gaps |
| Tapping block | Engage click joints |
| Pull bar | Install final rows |
| Saw | Cut planks |
| Pencil | Mark cuts |
| Straightedge | Check flatness |
| Moisture meter | Check substrate moisture |
How to Install Laminate Flooring Step by Step
The following steps describe the laminate flooring installation process. For specific installation requirements, always follow the manufacturer's instructions.
Step 1: Prepare the Subfloor
Clean the subfloor thoroughly. Remove debris, oil, and grease. Level any uneven areas with self-levelling compound. Allow the compound to cure fully before installation.
Step 2: Check Moisture and Flatness
Verify subfloor moisture content and flatness against the manufacturer's specification. Address any issues before proceeding.
Step 3: Acclimate the Flooring
Acclimate the laminate flooring in the installation area before installation, with packaging opened, so the planks can adjust to the room conditions. Follow the manufacturer's acclimation instructions. Acclimation allows the product to adjust to the room temperature and humidity.
Step 4: Install Vapor Barrier When Required
If a vapour barrier is required (typically for concrete subfloors), install it with taped seams, extended up the walls. Follow the manufacturer's instructions.
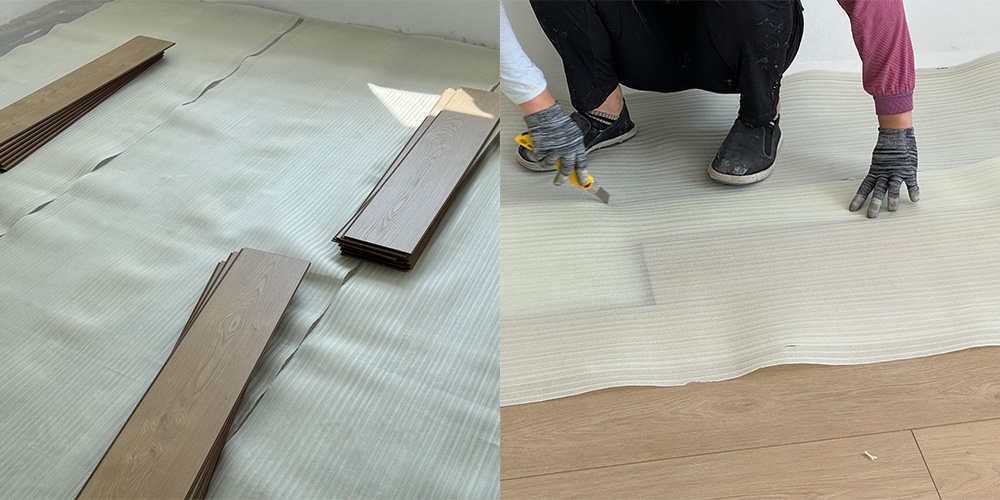
Step 5: Install Underlayment
If underlayment is required, install it according to the manufacturer's instructions. Underlayment provides acoustic performance and minor subfloor tolerance.
Step 6: Plan the First Row
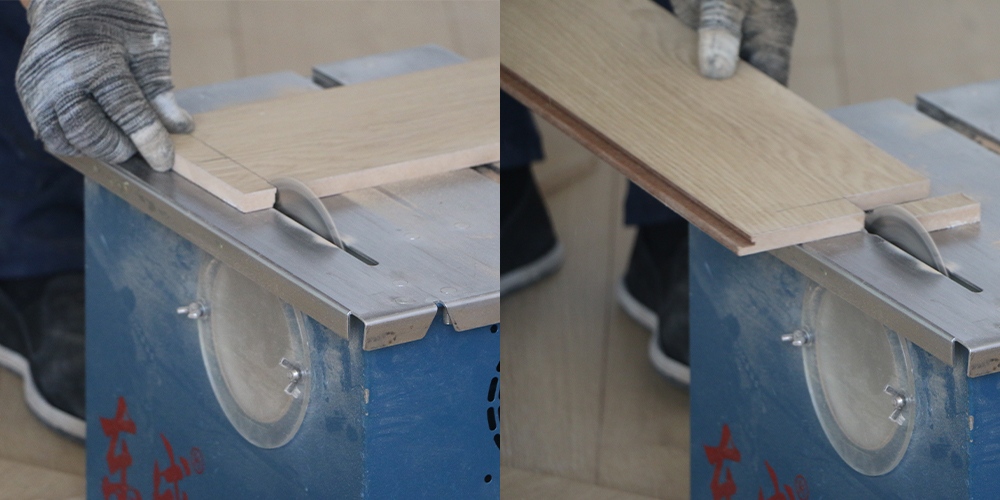
Plan the installation layout before starting. Determine the direction of the planks and the starting point. For the first row, cut the planks to size if needed, allowing for the expansion gap.
Step 7: Install the First Row
Start installation from the longest wall. Maintain the required expansion gap at all walls using spacers. Install the first row with the tongue facing the wall.
Step 8: Install Remaining Rows
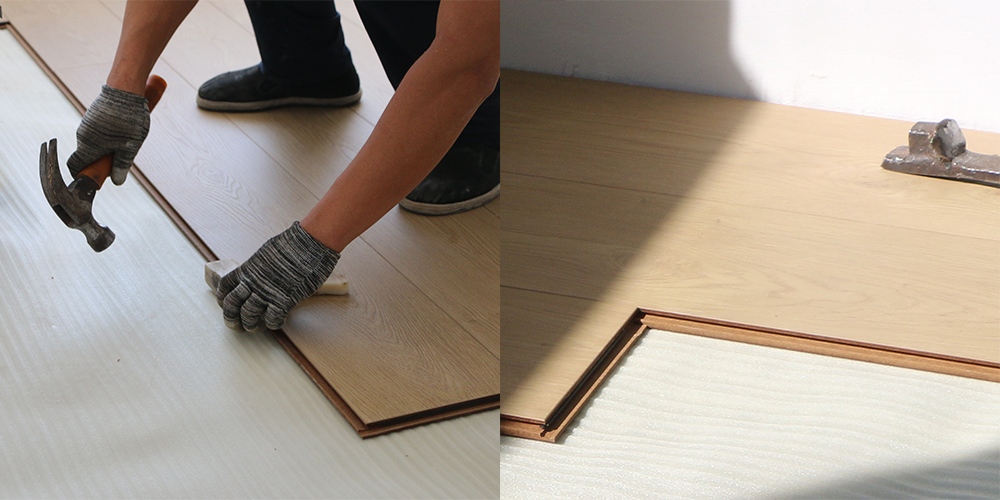
Connect the planks using the click-lock system. Insert the plank at the required angle and engage the lock. Use a tapping block (not a mallet) to ensure full engagement. For the last plank in a row, cut it to size and use a pull bar to engage the lock. Cut around obstacles such as door frames and pipes as you work, allowing for the expansion gap.
Step 9: Install Transitions
Install transition profiles at doorways and at the junction between laminate and other flooring types.
Step 10: Check Expansion Gaps
Verify that the expansion gaps are maintained at all walls and at intermediate intervals. For large rooms, install expansion profiles at the required intervals.
Step 11: Final Inspection
Inspect the finished floor for gaps, lipping, and joint engagement. Verify that the expansion gaps are maintained. Clean the floor and remove any debris. Install baseboards or quarter-round moldings to cover the expansion gap at the perimeter.
Installation Quality Checklist
After installation, check the following:
Expansion gaps maintained at all walls.
Joints fully engaged (no visible gaps between planks).
No lipping at joints.
Transition profiles installed correctly.
Baseboards or moldings installed.
Floor clean and free of debris.
No hollow or clicking sounds when walking on the floor.
How to Install Laminate Flooring Over Different Subfloors
Installation requirements vary by substrate. The following sections explain the key considerations for each substrate type.
Over Concrete
Key considerations: Moisture test, vapour barrier, flatness.
Concrete subfloors must be dry, flat, and clean. Verify moisture content before installation—typically ≤2.5% for laminate, depending on the product specification. Install a vapour barrier with taped seams, extended up the walls. Level any uneven areas with self-levelling compound and allow the compound to cure fully before installation. If the concrete is new, allow it to cure for the recommended period before installation. Verify the concrete surface is free of curing compound, oil, and grease—grinding or shot-blasting may be required.
Installation notes: Vapour barrier is required for concrete subfloors. Expansion gaps must be maintained at all walls. For large rooms, install expansion profiles at intermediate intervals.
For detailed installation over concrete, see the laminate flooring installation over concrete page.
Over Wood Subfloor
Key considerations: Structural stability, loose boards, moisture, flatness.
Wood subfloors must be sound, flat, and securely fastened. Repair or replace loose boards before installation. Verify moisture content—wood subfloor moisture content should be within the range specified by the manufacturer. Level any uneven areas with appropriate materials. If the wood subfloor is installed over a crawl space, verify that the crawl space is properly ventilated and that a vapour barrier is installed.
Installation notes: A vapour barrier may not be required over wood subfloors, depending on the manufacturer's instructions. Expansion gaps must be maintained at all walls.
For detailed installation over wood, see the laminate flooring installation over wood page.
Over Existing Tile
Key considerations: Tiles firmly bonded, grout and height, flatness, underlayment.
Laminate can be installed over existing tile if the tile is firmly bonded, flat, and clean. Loose tiles must be removed and the area levelled. Grout lines may need to be filled if they create unevenness beyond tolerance. Underlayment may be required to provide a smooth surface. Verify that the tile surface is free of wax, sealant, and other contaminants.
Installation notes: A vapour barrier may be required depending on the substrate beneath the tile. Expansion gaps must be maintained at all walls. The additional height of the laminate over the tile must be considered at doorways and transitions.
For detailed installation over tile, see the laminate flooring installation over tile page.
Common Laminate Flooring Installation Problems
The following problems are commonly observed in laminate flooring installations. Each entry explains the cause and the solution.
Problem 1: Planks Separate
Cause: The locking system is not fully engaged, the subfloor is uneven, or the installation angle was incorrect.
Solution: Check the subfloor flatness and address any unevenness. Use a tapping block and pull bar to ensure full engagement of the locking system. Follow the locking-system instructions for the correct installation angle. If the planks have already separated, disassemble the affected area and reinstall with correct technique.
Problem 2: Floor Buckles
Cause: Insufficient expansion gap, moisture, or a large uninterrupted floor area.
Solution: Increase expansion gaps and install expansion profiles at intermediate intervals. Address the moisture source. For large rooms, ensure that expansion profiles are installed at the required intervals.
Problem 3: Clicking or Hollow Sound
Cause: Uneven subfloor, inadequate underlayment, or debris beneath planks.
Solution: Address subfloor flatness. Verify underlayment installation. Clean the subfloor before installation to remove debris that could cause hollow spots.
Problem 4: Edge Swelling
Cause: Moisture, unsuitable substrate, or water exposure.
Solution: Address the moisture source. Verify substrate suitability for laminate flooring. Clean up spills promptly and avoid excessive water during cleaning.
Problem 5: Damaged Locking Edges
Cause: Direct hammering, wrong installation angle, or forcing boards together.
Solution: Replace damaged planks. Use a tapping block (not a mallet) and follow the correct installation angle. Do not force boards together—if a board does not engage easily, check the alignment and the locking profile.
Laminate Flooring Installation Project Case
The following case illustrates a laminate flooring installation project.
Project type: Office renovation.
Floor area: 12,000 m².
Project background: The project required a durable, consistent floor that could be installed quickly without major subfloor modification. Laminate flooring was selected over ceramic tile for installation speed and over carpet for maintenance.
Substrate: Concrete.
Moisture test: Subfloor moisture content verified before installation.
Flatness: Subfloor levelled with self-levelling compound where required.
Laminate thickness: 8 mm.
AC rating: AC4.
Underlayment: Acoustic underlayment installed.
Expansion gap: Maintained at all walls and at intermediate intervals.
Installation method: Floating click-lock installation over the levelled concrete subfloor.
Installation crew: Professional installation team.
Final inspection: Inspected for gaps, lipping, and joint engagement. Expansion gaps verified.
Result: Installation completed on schedule, meeting acoustic and durability requirements. Floating installation reduced project duration compared to ceramic tile.
For reference projects in your market, contact us.
FAQ: Laminate Flooring Installation
1. Can laminate flooring be installed over concrete?
Yes, with a vapour barrier. The concrete must be dry, flat, and clean. Verify moisture content before installation.
2. Can laminate flooring be installed over existing tile?
Yes, if the tile is firmly bonded, flat, and clean. Loose tiles must be removed and the area levelled.
3. Can laminate flooring be installed over wood?
Yes, if the wood subfloor is sound, flat, and securely fastened. Verify moisture content and repair any loose boards.
4. Do I need underlayment?
Underlayment is recommended for acoustic performance and minor subfloor tolerance. Some laminate products have integrated underlayment. Verify the product requirements.
5. Do I need a vapor barrier?
A vapour barrier is typically required for concrete subfloors. For wood subfloors, a vapour barrier may not be required. Follow the manufacturer's instructions.
6. How long should laminate flooring acclimate?
Acclimation time depends on the product and the room conditions. Follow the manufacturer's instructions. Typical acclimation time is 48 hours.
7. How much expansion gap is needed?
Expansion gap requirements depend on the room size and the expected temperature variation. Typical practice is 8–12 mm at the perimeter. Follow the product installation manual.
8. Can laminate flooring be installed over underfloor heating?
Yes, within specified temperature limits. Verify the product's underfloor heating compatibility and follow the underfloor heating manufacturer's instructions.
9. Can I install laminate flooring myself?
Yes, laminate flooring is designed for DIY installation. However, for large projects, complex layouts, or installations over concrete, professional installation is recommended. Before DIY installation, verify the subfloor condition, moisture content, and room conditions. Follow the manufacturer's installation instructions carefully.
10. What tools are needed?
Tape measure, spacers, tapping block, pull bar, saw, pencil, straightedge, and moisture meter. See the tools section above.
11. How do I install laminate flooring around door frames?
Cut the plank to fit around the door frame, allowing for the expansion gap. Undercut the door frame using a door jamb saw or oscillating tool, so the plank can slide underneath. The expansion gap must still be maintained at the wall.
12. How do I repair a damaged laminate plank?
Disassemble the floor from the nearest edge to the damaged plank, remove the damaged plank, install a new plank, and reassemble the floor.
13. Why is my laminate floor separating?
Planks can separate if the locking system is not fully engaged, the subfloor is uneven, or the installation angle was incorrect. Check the subfloor, ensure full joint engagement, and follow the locking-system instructions.
14. Why is my laminate floor buckling?
Buckling can be caused by insufficient expansion gaps, moisture, or a large uninterrupted floor area. Increase expansion gaps, install expansion profiles, and address the moisture source.
15. Why does my laminate floor make a clicking sound?
A clicking or hollow sound can be caused by an uneven subfloor, inadequate underlayment, or debris beneath the planks. Address subfloor flatness, verify underlayment installation, and clean the subfloor before installation.
CTA
For detailed installation manuals, technical datasheets, engineering samples, or project-based quotations, procurement and engineering teams are encouraged to request official technical documentation.