SPC Flooring Installation & Maintenance Guide
SPC Flooring Installation Requirements
SPC flooring installation requires specific site conditions to be met before installation begins. If these conditions are not met, the floor may fail—buckling, gapping, joint damage, or movement.
Subfloor flatness. The subfloor must be flat within tolerance. For SPC, flatness tolerance is typically ≤2 mm over 2 m. Uneven subfloors can cause lipping at joints, gaps, and premature locking system failure.
Subfloor cleanliness. The subfloor must be clean, dry, and free of debris, oil, grease, and curing compound. Contaminants can prevent proper contact between the floor and the underlayment, and can cause uneven support.
Moisture condition. Concrete subfloor moisture content must be verified before installation. SPC typically requires concrete moisture content ≤2.5%. High moisture can cause adhesive failure (for glue-down installations), mould growth, and damage to the flooring.
Temperature. The installation area should be at a stable temperature, typically 18–25°C. SPC should be acclimatised in the installation area before installation.
Humidity. Relative humidity should be within the range specified by the manufacturer, typically 40–60%. High humidity can affect installation and long-term performance.
Expansion requirements. SPC flooring expands and contracts with temperature changes. Expansion gaps must be provided at the perimeter and at intermediate intervals. The required gap depends on the room size and the expected temperature variation.
Existing floor condition. If SPC is being installed over an existing floor, the existing floor must be flat, sound, and clean. Loose tiles, soft spots, and uneven surfaces must be repaired before installation.
How to Prepare the Subfloor for SPC Flooring
Subfloor preparation is the most important step in SPC installation. Most installation problems can be traced back to inadequate subfloor preparation. The following sections cover the main subfloor types.
Concrete
Concrete subfloors must be dry, flat, and clean. Moisture content must be verified (typically ≤2.5% for SPC). Cracks and holes must be filled. Curing compound, oil, and grease must be removed—grinding or shot-blasting may be required. A vapour barrier is required for ground-floor installations.
Tile
SPC can be installed over existing tile if the tile is flat, sound, and clean. Loose tiles must be removed and the area levelled. Grout lines may need to be filled if they create unevenness beyond ±2 mm over 2 m. A vapour barrier is required for ground-floor installations.
Plywood
Plywood subfloors must be sound, flat, and securely fastened. Gaps between plywood sheets should be filled. A moisture barrier may be required depending on the installation location.
Existing Flooring
SPC can be installed over existing hard floors (tile, LVT, laminate) if the existing floor is flat, sound, and clean. Do not install over carpet or uneven surfaces. Existing flooring that is loose, damaged, or uneven must be repaired or removed.
Uneven Surfaces
Uneven surfaces must be levelled before installation. Self-levelling compound can be used for minor unevenness. For larger unevenness, the subfloor may need to be repaired or replaced.
Cracks
Cracks in the subfloor must be filled and sealed before installation. Moving cracks may require a different repair approach.
Moisture
Moisture is the most common cause of SPC installation failure. Verify subfloor moisture content before installation. Install a vapour barrier for ground-floor installations. In areas with high moisture risk, consider additional moisture control measures.
Tools Needed to Install SPC Flooring
The following tools are typically required for SPC click-lock installation.
Required tools:
Tape measure
Utility knife
Rubber mallet
Tapping block
Pull bar
Spacers
Straight edge
Pencil
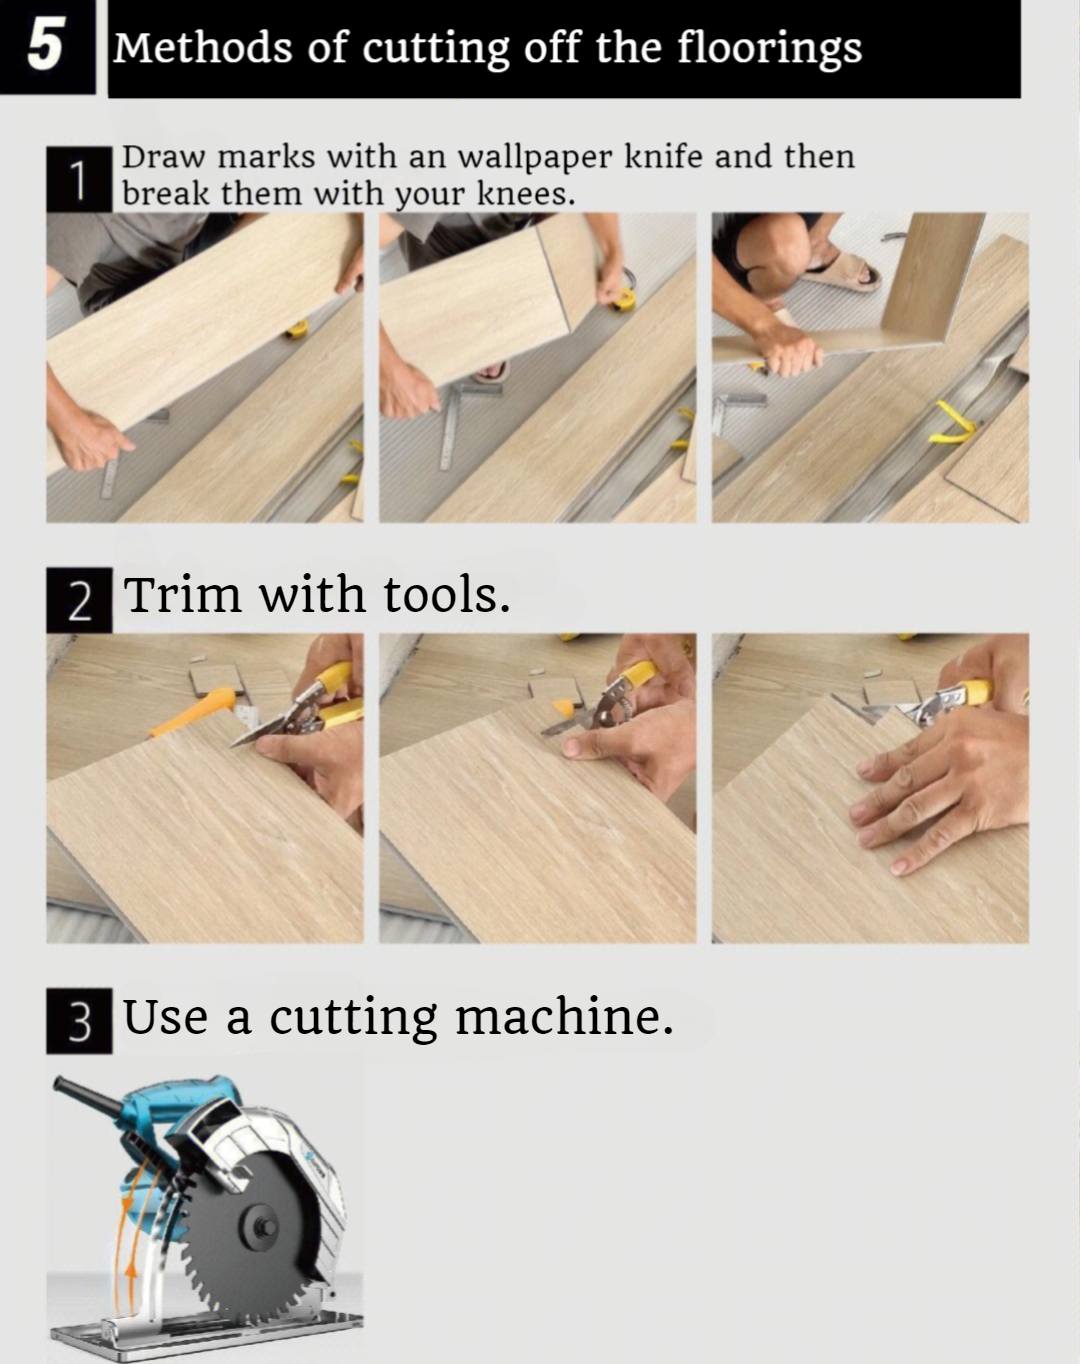
Saw: hand saw for simple cuts, power saw or mitre saw for large installations, jigsaw for irregular cuts
Recommended safety equipment:
Safety glasses
Knee pads
Gloves
Optional or location-dependent:
Vapour barrier (required for ground-floor installations)
Underlayment (if required for acoustic performance or subfloor tolerance)
How to Install SPC Flooring
The following steps describe the SPC click-lock installation process. For specific installation requirements, always follow the manufacturer's instructions.
Step 1: Inspect the Subfloor
Verify that the subfloor is flat (≤2 mm over 2 m), clean, dry, and sound. Check for cracks, unevenness, and contamination. Address any issues before proceeding.
Step 2: Clean and Level the Surface
Clean the subfloor thoroughly. Remove debris, oil, and grease. Level any uneven areas with self-levelling compound. Allow the compound to cure fully before installation.
Step 3: Check Moisture and Temperature
Verify subfloor moisture content (typically ≤2.5% for concrete). Verify that the installation area temperature is within range (typically 18–25°C) and humidity is within range (typically 40–60%).
Step 4: Plan the Layout
Plan the installation layout before starting. Determine the direction of the planks, the starting point, and how the planks will be cut at the edges. For large rooms, plan for expansion profiles at intermediate intervals.
Step 5: Install Underlayment if Required
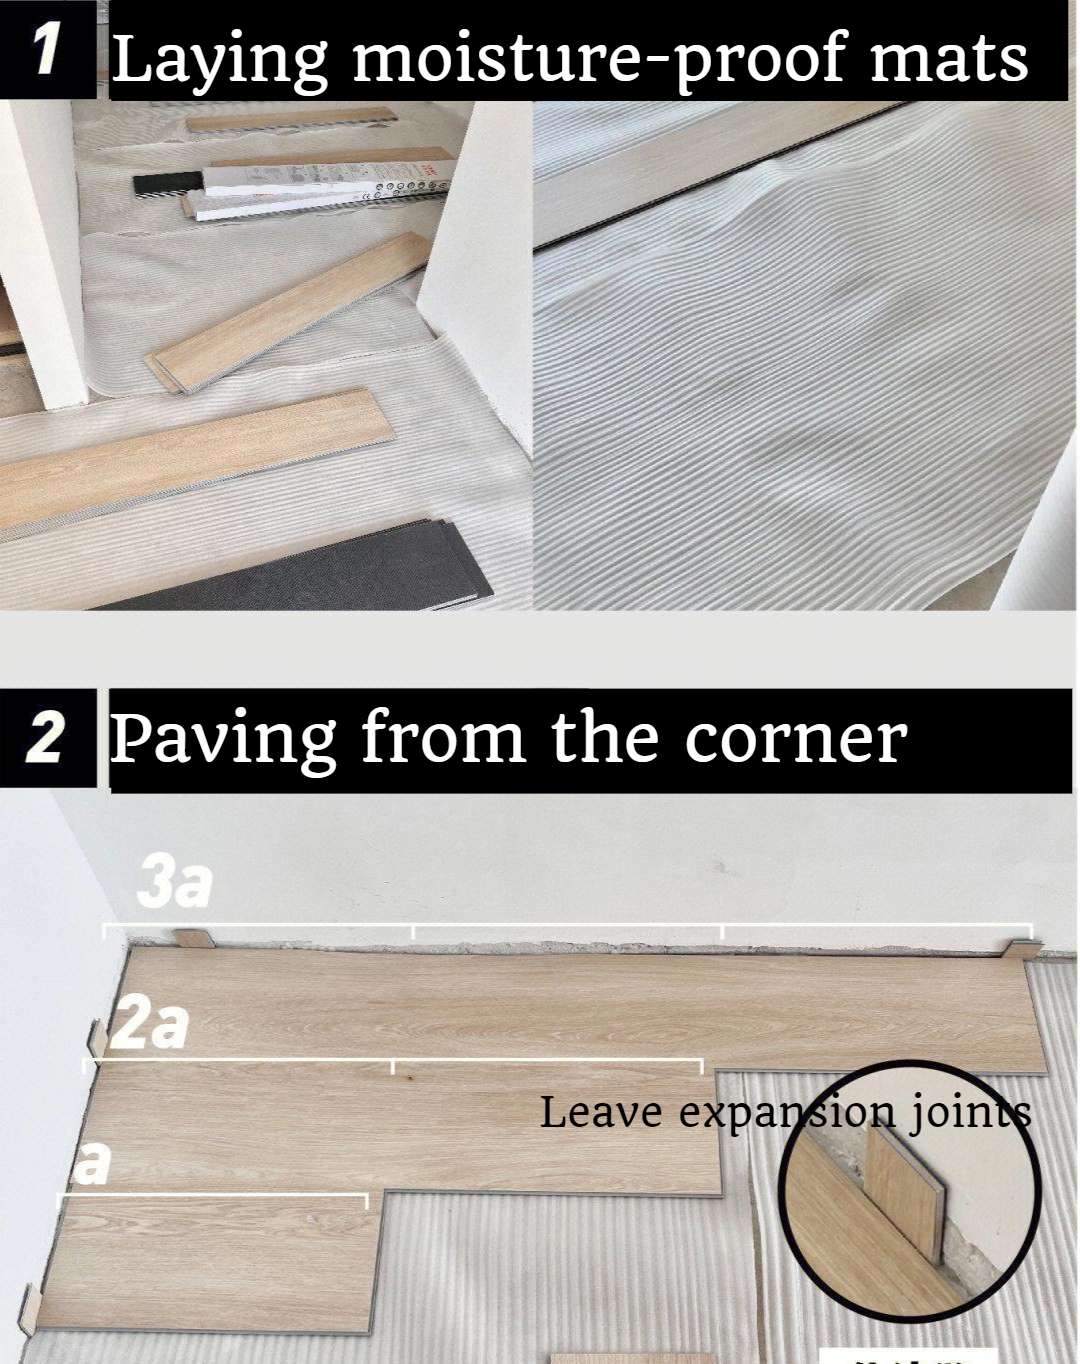
If underlayment is required (for acoustic performance or moisture control), install it according to the manufacturer's instructions. For ground-floor installations, install a vapour barrier with taped seams, extended 50 mm up the walls.
Step 6: Install the First Row
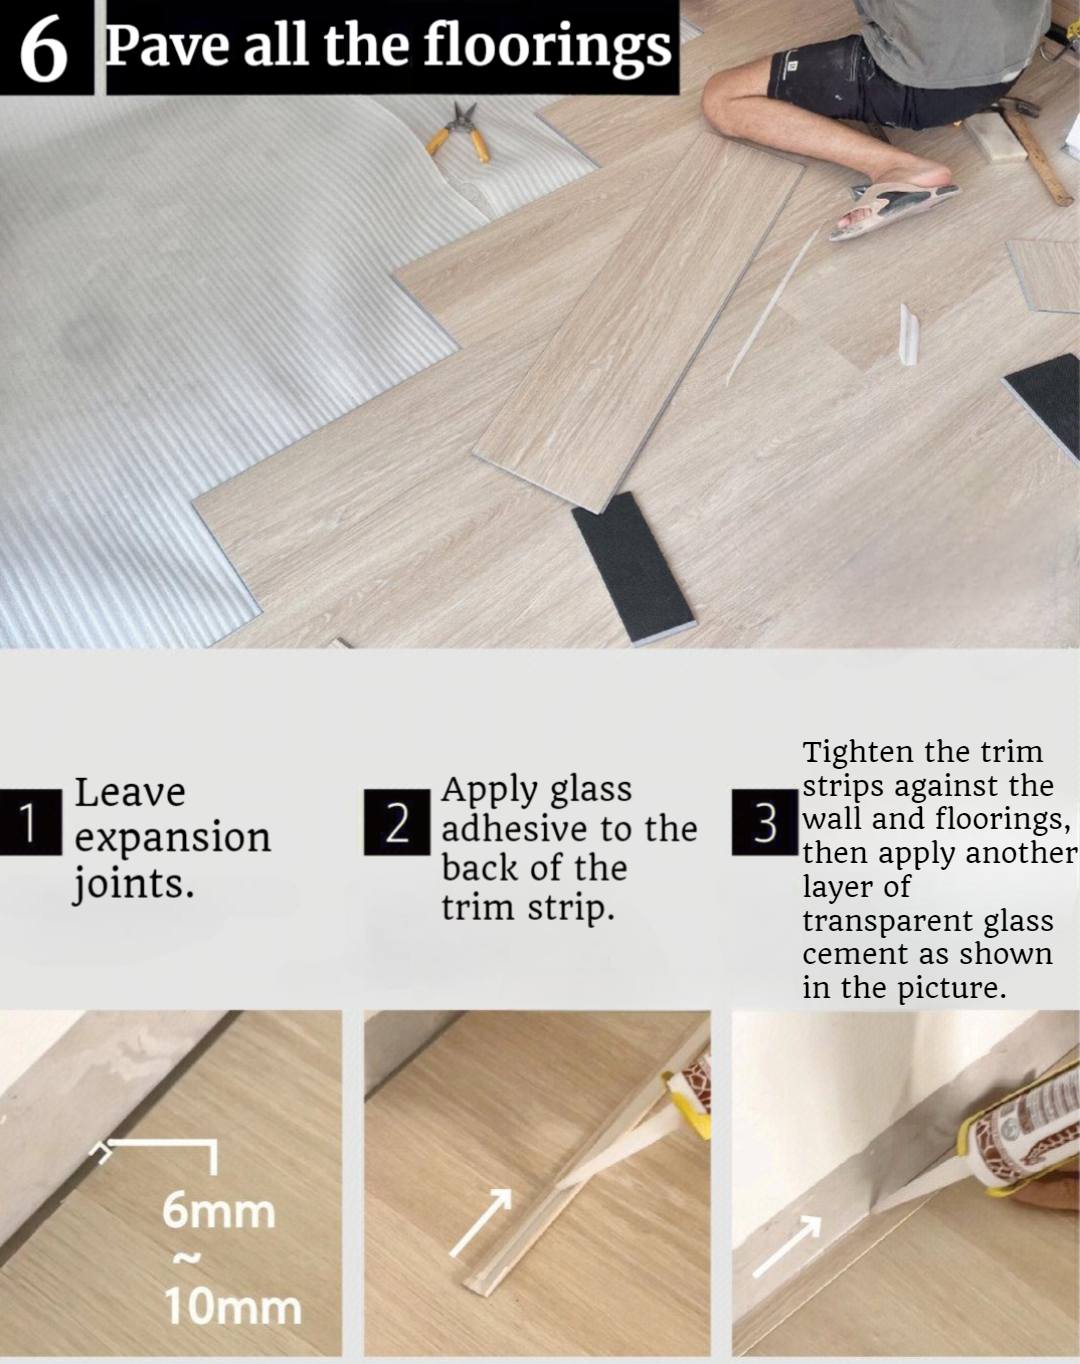
Start installation from the longest wall. Maintain the required expansion gap (typically 5–8 mm) at all walls using spacers. Install the first row with the tongue facing the wall.
Step 7: Connect the Click-Lock Planks
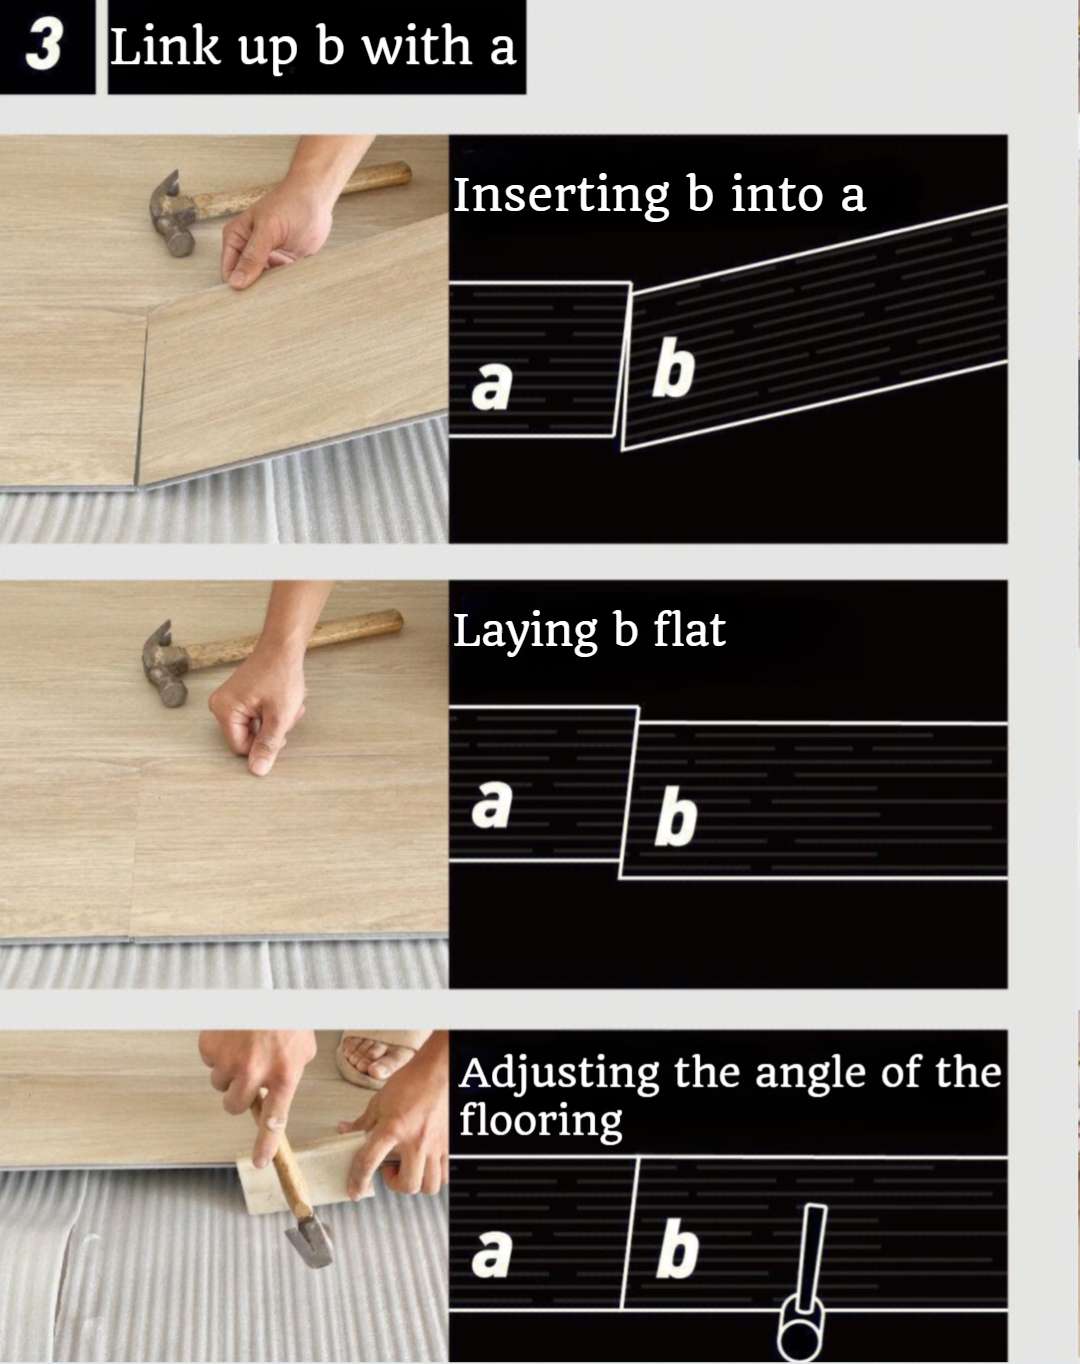
Connect the planks using the click-lock system. For angle-tap systems, insert the plank at a 20–30° angle and engage the lock. For drop-lock systems, insert the plank vertically into the previous plank. For 5G click systems, insert the plank at a low angle and click it into place. Use a tapping block (not a mallet) to ensure full engagement.
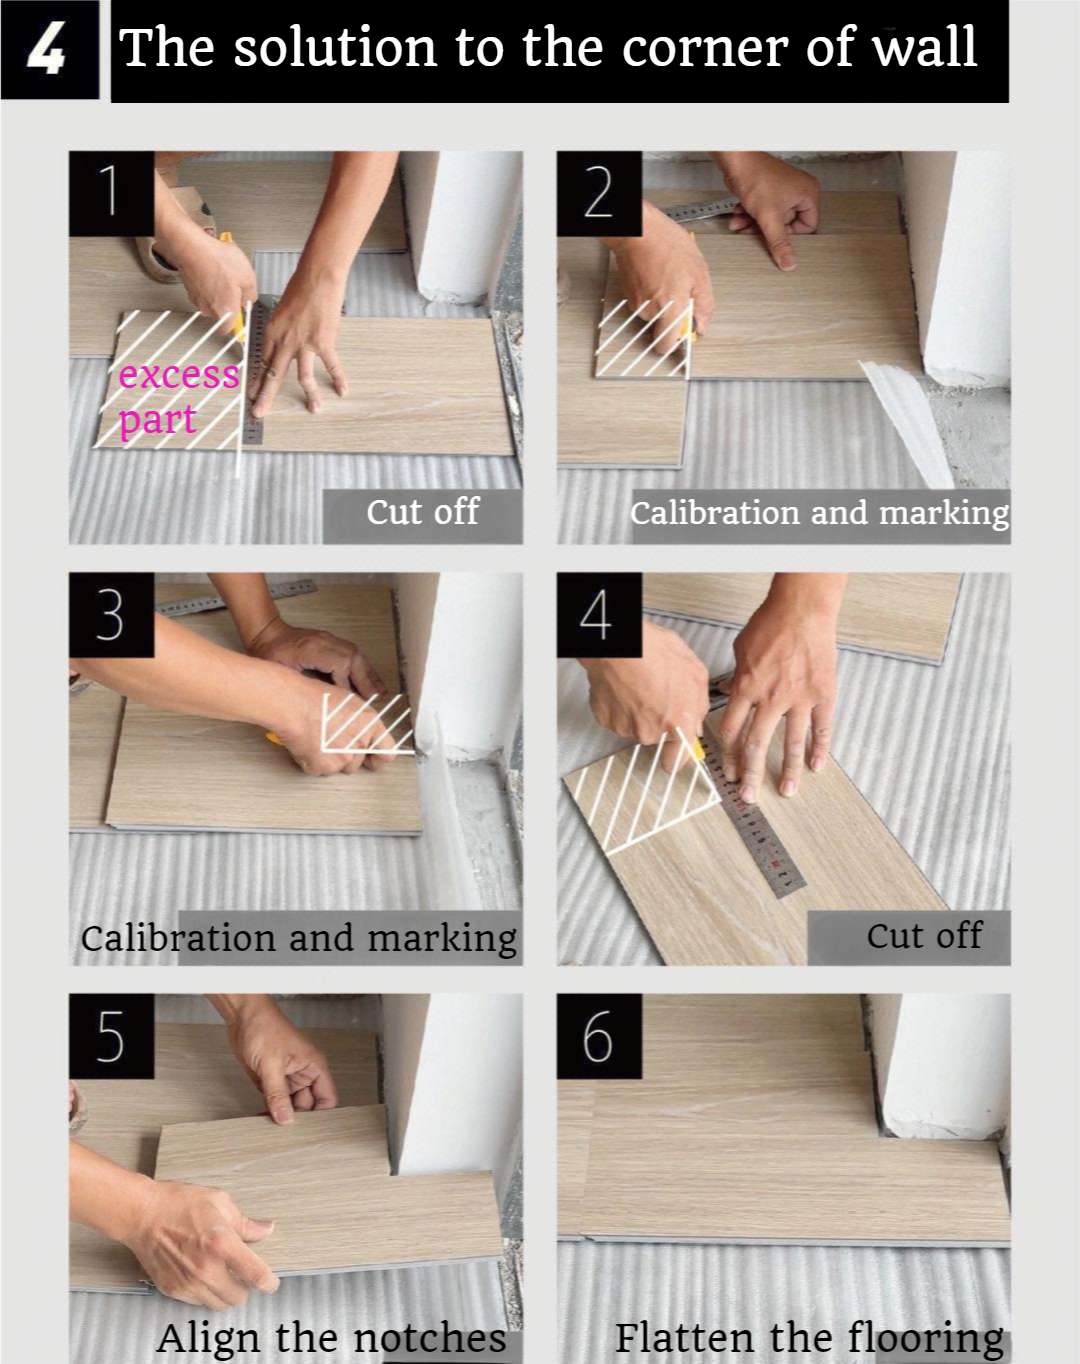
For the last plank in a row, cut it to size and use a pull bar to engage the lock. For the last row (against the opposite wall), cut the planks to width, allowing for the expansion gap, and use a pull bar to engage the locks. See Step 9 for details.
Step 8: Maintain Expansion Gaps
Maintain the required expansion gap at all walls and at intermediate intervals. For rooms larger than 8 m, install expansion profiles at 5–8 m intervals.
Step 9: Install the Final Row
Cut the final row planks to size, allowing for the expansion gap. Use a pull bar to engage the locks. Install transition profiles at doorways.
Step 10: Install Transitions and Moldings
Install transition profiles at doorways and at the junction between SPC and other flooring types. Install baseboards or quarter-round moldings to cover the expansion gap at the perimeter.
Step 11: Inspect the Finished Floor
Inspect the finished floor for gaps, lipping, and joint engagement. Verify that the expansion gaps are maintained. Clean the floor and remove any debris.
Common SPC Flooring Installation Problems
The following problems are commonly observed in SPC installations. The most common problem in SPC installations is joint separation, followed by buckling, gapping, broken click-lock joints, raised edges, movement, and creaking or clicking sounds. Each entry explains the cause and the solution.
SPC Flooring Buckling
Cause: Insufficient expansion gaps, excessive temperature variation, or moisture ingress.
Solution: Increase expansion gaps; install expansion profiles at intermediate intervals; address moisture source.
Prevention: Calculate expansion gaps correctly; install expansion profiles; maintain appropriate indoor temperature and humidity.
Gaps Between SPC Planks
Cause: Incomplete joint engagement, subfloor unevenness, or thermal movement. Gaps that appear immediately after installation are usually installation-related.
Solution: For small gaps, use colour-matched filler; for larger gaps, disassemble and reinstall with correct technique.
Prevention: Verify subfloor flatness; ensure full joint engagement during installation; calculate expansion gaps correctly.
Broken Click-Lock Joints
Cause: Excessive force during installation, incorrect installation angle, or damaged profile.
Solution: Replace damaged planks; use a tapping block (not a mallet) and correct installation angle.
Prevention: Verify profile quality; use correct installation technique; avoid excessive force.
SPC Flooring Moving or Shifting
Cause: Insufficient expansion gaps, inadequate perimeter support, or subfloor movement.
Solution: Verify expansion gaps; install baseboards or moldings to secure the perimeter; address subfloor movement.
Prevention: Calculate expansion gaps correctly; secure the perimeter; verify subfloor stability.
Raised Edges
Cause: Subfloor unevenness, incomplete joint engagement, or moisture-related swelling.
Solution: Address subfloor unevenness; ensure full joint engagement; address moisture source.
Prevention: Verify subfloor flatness; ensure full joint engagement; maintain appropriate indoor humidity.
Creaking or Clicking Sounds
Cause: Uneven subfloor, inadequate underlayment, or loose joints.
Solution: Address subfloor flatness; verify underlayment installation; check joint engagement.
Prevention: Verify subfloor flatness; use appropriate underlayment; ensure full joint engagement.
Joint Separation
Cause: Joint separation that develops after installation is typically caused by thermal movement or a damaged locking profile. Unlike gaps that appear immediately after installation (which are usually installation-related), post-installation separation indicates a longer-term issue.
Solution: For small gaps, use colour-matched filler; for larger gaps, disassemble and replace affected planks. Verify the expansion gap calculation and inspect the locking profiles.
Prevention: Calculate expansion gaps correctly; install expansion profiles; handle planks carefully during installation; verify locking profile quality.
How to Maintain SPC Flooring
SPC flooring requires relatively little maintenance, but proper maintenance extends the service life and preserves the appearance of the floor.
Daily Cleaning
Dry mop or vacuum to remove dirt and grit. Dirt and grit can scratch the surface if not removed.
Weekly Cleaning
Damp mop with a pH-neutral cleaner. Avoid excess water—use a well-wrung mop. Do not use abrasive cleaning tools.
Deep Cleaning
Deep clean every 1–3 months, depending on traffic and soiling. Use a pH-neutral cleaner and a soft brush or mop. Avoid bleach, acid-based cleaners, and aggressive degreasers that can damage the wear layer or surface.
Removing Stains
Remove spills promptly. For stubborn stains, use a pH-neutral cleaner and a soft cloth. Avoid abrasive cleaners or scouring pads.
Preventing Scratches
Use protective pads under furniture legs. Avoid dragging heavy furniture across the floor. Keep the floor free of grit and debris.
Protecting SPC Flooring From Heavy Furniture
Use furniture pads or glides under heavy furniture. For very heavy furniture, use a protective mat to distribute the weight.
Managing Water and Moisture
Clean up spills promptly. Avoid excessive water during cleaning. In areas with high moisture risk, maintain appropriate ventilation.
When to Replace a Damaged Plank
Replace a damaged plank if it is deeply scratched, chipped, or has a broken locking profile. Individual planks can be replaced without removing the entire floor, provided the locking profiles are not damaged.
Cleaning by Area
Cleaning requirements vary by area. High-traffic areas (entrances, corridors) may require more frequent cleaning. Wet areas (bathrooms, kitchens) require prompt spill cleanup. Commercial spaces may require daily deep cleaning; residential spaces may require weekly deep cleaning.
How to Repair Damaged SPC Flooring
SPC flooring can be repaired in several ways, depending on the type of damage.
Scratched plank. For light scratches, use a colour-matched repair compound. For deep scratches, replace the plank.
Chipped edge. For minor chips, use a colour-matched repair compound. For significant chips, replace the plank.
Broken click-lock. Replace the plank. The broken profile cannot be repaired.
Water-related damage. Address the moisture source first. Then replace any damaged planks. If the damage is extensive, the entire floor may need to be replaced.
Individual plank replacement. To replace an individual plank, disassemble the floor from the nearest edge to the damaged plank, remove the damaged plank, install a new plank, and reassemble the floor. For planks in the middle of the floor, the floor may need to be disassembled from the nearest edge.
Repair vs replacement cost. Individual plank replacement is typically much less expensive than replacing the entire floor. However, if the damage is extensive or if the locking profiles are widely damaged, full replacement may be more cost-effective. Compare repair cost against replacement cost for the specific situation.
After repair. Inspect the repaired area for joint engagement, lipping, and colour match. Verify that the expansion gap is maintained. If the repair is not satisfactory, replace the affected planks again.
SPC Flooring Installation in Different Locations
SPC flooring can be installed in a range of locations, each with specific considerations.
SPC Flooring Over Concrete
Concrete subfloors must be dry, flat, and clean. Verify moisture content (typically ≤2.5%). Install a vapour barrier for ground-floor installations.
SPC Flooring Over Tile
SPC can be installed over existing tile if the tile is flat, sound, and clean. Loose tiles must be removed and the area levelled. Grout lines may need to be filled if they create unevenness beyond tolerance. A vapour barrier is required for ground-floor installations.
SPC Flooring Over Plywood
Plywood subfloors must be sound, flat, and securely fastened. Gaps between plywood sheets should be filled. A moisture barrier may be required.
SPC Flooring in Bathrooms
SPC is suitable for bathrooms, with certain limitations. SPC is waterproof at the core, but the joints are not designed for continuous standing water. Use gasket joints and seal the perimeter. SPC is not suitable for shower floors—use tile with a waterproofing membrane for shower areas.
SPC Flooring in Kitchens
SPC is suitable for kitchens. Clean up spills promptly, and use gasket joints and perimeter sealing to protect against moisture ingress.
SPC Flooring in Garages and Basements
SPC can be installed in garages and basements, provided the subfloor is dry and a vapour barrier is installed. In basements, moisture vapour from the subfloor is a common issue—verify moisture content and install a vapour barrier. In garages, temperature variation may be greater than in living areas—verify the product's temperature range.
SPC Flooring With Underfloor Heating
SPC is compatible with underfloor heating within specified temperature limits (typically ≤27°C surface temperature). The underfloor heating system must be commissioned and brought to operating temperature before installation, then cooled before installation. After installation, the temperature should be raised gradually. Follow the underfloor heating manufacturer's instructions and verify compatibility with the specific SPC product.
SPC Flooring Installation Case Study
The following case illustrates a typical SPC installation project.
Project type: Commercial office renovation.
Floor area: 9,500 m².
Existing floor: Ceramic tile.
Project background: The project required a durable, low-maintenance floor that could be installed over the existing tile without demolition. SPC was selected for its dimensional stability, moisture resistance, and click-lock installation.
Subfloor preparation: Existing tile verified as flat, sound, and clean. Grout lines filled where needed. Vapour barrier installed (ground floor). Underlayment installed for acoustic performance.
SPC specification: 5.5 mm SPC flooring with 0.5 mm wear layer, click-lock system.
Installation method: Floating click-lock installation over the existing tile. Expansion gaps maintained at all walls and at intermediate intervals.
Installation time: Approximately 6 weeks for 9,500 m². Floating installation over existing tile eliminated demolition and reduced project duration by approximately 25% compared to the original schedule.
Problems encountered: Minor subfloor unevenness in some areas, addressed with self-levelling compound before installation.
Solution: Self-levelling compound applied and cured before installation. Installation proceeded without further issues.
Final result: Installation completed on schedule. Floating installation eliminated demolition costs and reduced project duration by 25%. After installation, the floor maintained surface integrity and joint performance under commercial office traffic. Ongoing maintenance was simplified to routine dry and damp cleaning.
FAQ: SPC Flooring Installation and Maintenance
1. How do you install SPC flooring?
SPC flooring is installed using a click-lock system. The subfloor must be flat, clean, and dry. Underlayment and vapour barrier are installed if required. The planks are connected using the click-lock system, with expansion gaps maintained at all walls. Transition profiles and moldings are installed at the end. See the installation steps above for details.
2. Can SPC flooring be installed over concrete?
Yes, with proper subfloor preparation. The concrete must be dry, flat, and clean. Verify moisture content (typically ≤2.5%) and install a vapour barrier for ground-floor installations.
3. Can SPC flooring be installed over tile?
Yes, if the tile is flat, sound, and clean. Loose tiles must be removed and the area levelled. Grout lines may need to be filled if they create unevenness beyond tolerance.
4. Does SPC flooring need underlayment?
Underlayment is recommended for acoustic performance and can also provide minor subfloor tolerance. Some SPC products have integrated underlayment. Verify the product requirements and the project's acoustic requirements.
5. How long does SPC flooring need to acclimatise before installation?
Minimal acclimation is recommended—typically 24–48 hours in the installation area. This allows the product to adjust to the room temperature before installation. For larger installations or installations in extreme conditions, a longer acclimation period may be required. Verify the manufacturer's requirements.
6. How much expansion gap does SPC flooring need?
Typical practice is 5–8 mm at the perimeter for rooms up to 8 m in length. For larger rooms, expansion profiles may be required at intermediate intervals. The exact requirement depends on the room size, expected temperature variation, and product specification. Verify the manufacturer's requirements.
7. Can SPC flooring be installed in a bathroom?
Yes, with limitations. SPC is waterproof at the core, but the joints are not designed for continuous standing water. Use gasket joints and seal the perimeter. SPC is not suitable for shower floors—use tile with a waterproofing membrane for shower areas.
8. How do you clean SPC flooring?
Daily: dry mop or vacuum. Weekly: damp mop with a pH-neutral cleaner. Avoid excess water, abrasive cleaning tools, bleach, acid-based cleaners, and aggressive degreasers.
9. How do you repair damaged SPC flooring?
For light scratches, use a colour-matched repair compound. For deep scratches, chips, or broken click-lock profiles, replace the plank. Individual planks can be replaced by disassembling the floor from the nearest edge.
10. Why is my SPC flooring separating?
Joint separation can be caused by insufficient expansion gaps, thermal movement, or a damaged locking profile. Post-installation separation (developing after use) is typically caused by thermal movement or a damaged locking profile, rather than installation technique alone. Check the expansion gaps, verify the locking profile condition, and replace damaged planks if necessary.
11. Why is my SPC flooring buckling?
Buckling can be caused by insufficient expansion gaps, excessive temperature variation, or moisture ingress. Increase expansion gaps, install expansion profiles, and address the moisture source.
12. Can SPC flooring be used with underfloor heating?
Yes, within specified temperature limits (typically ≤27°C surface temperature). Follow the underfloor heating manufacturer's instructions and verify compatibility with the specific SPC product.